Photographing Jewellery by Beynaz Mistry

When jewellery is photographed well – it seems to viewers as if it was love-at-first-sight between the camera and its beautiful subject. But if the truth be told – jewellery photography is a very complex art and science, and it in fact usually takes hours just to get the required compatibility going between the camera and a piece of jewellery, and a few more to achieve that mesmerising final shot. Every self-respecting jewellery item presents a big hurdle to even the best of cameras! The same highly-polished surface that is “meat” to the wearer is “poison” to the camera. Jewellery is dreadfully reflective of light and everything else around. Because the impediment springs forth from the surroundings, one has to somewhat isolate the object. That’s why it’s best to shoot jewellery in a highly controlled environment at a professional studio.
I have tried to cover some basics for how jewellery photography is done:
Lighting is Arguably the Single Most Important Factor for Jewellery Photography:
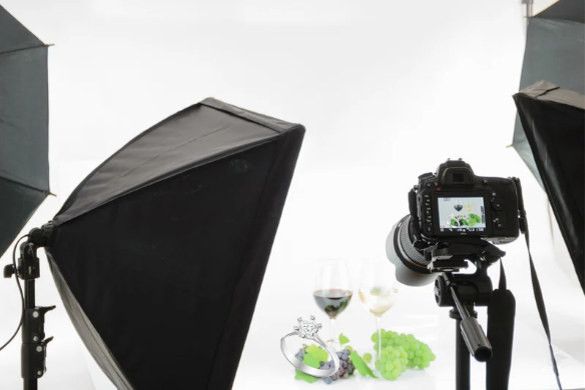
The key to wielding power over the reflective nature of jewellery is to use an enclosed lighting system. This is most typically done with the use of a lighting tent or reflectors and white cards.
Now, the hitch is that a piece of jewellery needs some lighting in order to be photographed in a way that communicates and even enhances its beauty. The photographer must not expose the piece to light directly, because direct light will reflect off the jewellery and create undesirable hot spots and shadows. The correct technique entails exposing the jewellery to diffused light. This is done by passing light through some sort of light diffuser. The diffuser evenly spreads the light, and eliminates all hot-spots, shadows and reflections.
(Work for: Jewels by Queenie)
Use a Tripod with a Geared Tripod Head:
Even the slightest movement will cause the picture to be blurry, so, a tripod is a necessity – not an option. The tripod also needs to be very stable. I use a sturdy tripod with a geared tripod head for precise movements of the camera. This ensures the sharpest photographs possible.
Visualising the Shot in Advance:
The shot is usually first visualised by an Art Director or a Stylist, but can also be decided with consultation between photographer and client. The visualisation process involves deciding on the whole creative concept. This includes the colour scheme, look and feel of the shot, etc.
Details of conceptual decisions depend on whether the jewellery is being shot for an e-commerce website or for some print medium. The former usually warrants either a black or white background, while the latter, a stylised one. Decisions for use of colour usually take into perspective colours used in the actual product, house colours of the brand, etc.
Creating Desirable Visual Effects:
When photographing jewellery, you sometimes want strategic shadows and reflections to create a certain, natural look. At the same time, there are other reflections and shadows that you want to avoid, all in the pursuit of capturing an image that presents the object of jewellery in the best way possible.
What you need to do is work with the light to create the effects you want. This is usually achieved with indirect lighting. It is a skill that is hard to explain and learned on the job.
(Work for: Jasani)
Often, as part of the creative idea, a piece of jewellery needs to be kept erect. I use a product called “tacky wax” to hold jewellery in place. It is easy to clean off jewellery and does the job very well.
Camera Equipment, Technology & Props:
The camera must always be a full-frame camera. In my opinion – the brand is not of much significance. I use a ‘Lens 100mm Macro’ for almost all my jewellery work. Studio lights must always be used so the amount of light can be controlled.
Post-Production:
The post production process can be as time-consuming as the actual shooting. I take anywhere from 1 hour to 8, per image. Post-production can be as expensive as the shoot. It is a skill in itself. One that, again – must be learned.
My advice to those who want to work in the field of product photography is to definitely do a solid course. There are professional techniques that can only be sought through practical knowledge. Also, don’t hesitate to find a mentor you can train under, or in the very least who is willing to offer you guidance about the tricks of the trade.
About the Author:
Beynaz Mistry is an accomplished professional food, product and travel photographer. She lends her expertise to other genres as well.
Website: http://www.beynazmistry.in/
E-mail: beynazmistry@gmail.com